All Praise Seitan!

The last time I made seitan was over two decades ago. I had never heard of the stuff before. Seitan was years away from appearing in American stores, even in health food stores. While in a suburban supermarket I picked up a copy of a then cutting edge book on vegetarian eating called “Eating For The Eighties”. I enjoyed the book, so when I found another book by the same husband and wife team in my public library I checked it out. That book described seitan and had a recipe for making it from scratch.

Seitan is wheat gluten. Gluten is the protein in wheat. You get gluten by making wheat flour into dough and kneading the dough in a pot of water until you have squished out all of the starch, leaving only the sinewy protein. The sinewy protein bears a striking resemblance to meat.

So, I made the dough and sat down in the morning with a saucepan of water. It took me all day long to reach the point that when I squeezed the dough no more white starch came out into the water. I wasn’t ready to being cooking the seitan until dinner time. The results looked amazingly like “London Broil” , didn’t taste anything like it, though it didn’t taste bad and it had the rubbery texture of basic seitan that hasn’t been dressed up in a more elaborate recipe.

Making seitan from ordinary flour was a good experience. It gave me a sense of how hard people had to work in the distant past just to eat. It literally took me all day to make.

Well, in the year 2011 I can buy “vital wheat gluten” in the baking section of my local supermarket. Vital wheat gluten is wheat flour with the starch already removed for you. You can use vital wheat gluten to make seitan in fraction of the time it takes to make seitan from scratch. Hours and hours of kneading are no longer required.

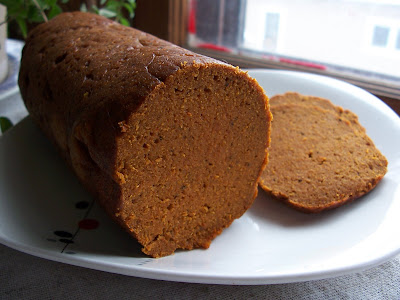
I made this incredible recipe last night. It came out even better looking than the borrowed picture above. It took me about 20 minutes of preparation time, before I was free for an hour and half while it cooked.

The seitan roll I got fresh out of the oven was very similar to the spicy Tofurkey Kielbasa you can get in stores. The vital wheat gluten flour for the recipe cost me a little bit over $3. I had most of the other ingredients already, as I think many vegans would.

I was amazed how tasty it was and I was amazed how easy it was to make:

Dry Ingredients:

  • 1.5 cups vital wheat gluten
  • 1/4 cup nutritional yeast
  • 2 tsp paprika
  • 1 tsp salt ( I left this out )
  • 1/4 tsp cinnamon
  • 1/4 tsp cumin ( I couldn’t find mine and left this out )
  • 1-2 tsp black pepper ( I accidentally used tablespoons, it still came out okay )
  • 1/8 tsp cayenne pepper ( I used 1/4 tsp )
  • 1/8 tsp allspice (I used 1/4 tsp)

Wet Ingredients:

  • 3/4 cup cold water
  • 4 tbsp tomato paste
  • 1 tbsp ketchup
  • 2 tbsp olive oil (I used canola oil)
  • 2 tbsp vegan Worcestershire sauce (I used Bragg’s soy sauce instead)
  • 1-3 cloves garlic, crushed

Directions:

  1. Preheat your oven to 325 degrees Fahrenheit
  2. Combine the dry and wet ingredients in separate mixing bowls
  3. Mix the ingredients in each bowl well
  4. Add the wet ingredients to the dry ingredients, mix well
  5. Knead the dough for about 4 minutes
  6. Shape the dough into a log about 6 – 8 inches long
  7. Wrap the log in foil, twisting the ends closed
  8. Put the log into the oven for 90 minutes
  9. Unwrap the log and let it cool completely
  10. Store the log in the foil or in plastic, inside of a refrigerator

Beans


Picture of a variety of dried beans

Legumes are known for their high protein content, but they also have high amounts of fiber and high amounts of other nutrients.  Legumes are cheap and legumes help improve the soil where they are grown.

There are two great all vegan bean recipe books:

      1. “The Great Vegan Bean Book” by Kathy Hester
      2. “Fabulous Beans” by Barb Bloomfield

Legumes are done cooking when they are “al dente”, soft, like a baked potato ( except for soybeans and peanuts ).

What About Gas?

Legumes contain oligosaccharides, a type of carbohydrate that is hard to break down.  This can lead to gas.  The amount of gas experienced can be reduced.

Methods For Reducing Gas

      1. Legume Choice
      2. Soaking
      3. Quick Boiling
      4. Pressure Cooking
      5. Miscellaneous Methods

Legume Choice

Not all legumes have the same amount of oligosaccharides. If you eat legumes with less oligosaccharides you will get less, if any gas.


Lower Oligosaccharide Legumes

        1. lentils
        2. mung beans
        3. black eyed peas
        4. split peas
        5. peanuts
        6. organic ( avoid GMO ) soy beans and soy foods.


Higher Oligosaccharide Legumes

        1. black beans
        2. kidney beans
        3. navy beans
        4. pinto beans
        5. chickpeas aka garbanzo beans

Soaking

Soaking legumes in water overnight reduces the amount of oligosaccharides in them, reducing the amount of gas.  Put 2 cups of dried legumes into 6 cups of water in a sealed container at room temperature overnight. You can make soaking even more effective by adding 2 teaspoons of baking soda to the water.  After soaking, discard the water the legumes soaked in and rinse the legumes off to wash away more oligosaccharides.

Quick Boiling

I’ve found “quick boiling” to be the most effective method for reducing gas. It isn’t necessary for and should not be used on legumes from the low oligosaccharide group. After soaking 1 part legumes with 3 parts water overnight, rinse off the legumes and change the water. Bring the legumes and the fresh change of water to a rolling boil for 1 minute. Then change the water again. Doing so will “boil out” more gas producing oligosaccharides. If you don’t eat legumes from the high oligosaccharide often, I would recommend repeating this at least 2 times before cooking the legumes. You will not lose a significant amount of nutrition. You will also notice much more comfort after eating the high oligosaccharide legumes prepared this way.

Pressure Cooking

A pressure cooker is a pot with a lid held on by a strong clamp. This allows pressure to build up inside of the pot making the temperature inside go higher than would be possible with a sauce pan. This results in food being cooked much more quickly….at a speed competitive with microwave ovens.

I’ve also found, through my personal experience, that pressure cooking will greatly reduce gas, especially if you also soak the legumes and do “quick boiling” as described above. If you can afford it, I would recommend getting a stainless steel pressure cooker.

In general you want to combine 2 cups of legumes with 6 cups of water in a pressure cooker.  One hour of conventional boiling time becomes 5 minutes of cooking under pressure + 10 minutes of resting time with the heat off.  You begin timing once the pressure indicator goes up.  Turn the heat to low.  Once the time is up turn off the heat and let the pressure cooker cool down naturally.  Doing so is good for the quality of the cooking and for making your pressure cooker last longer.  The legumes will continue to cook while the heat is off and the pressure indicator is still up.

      • 1 minute – lentils
      • 5 minutes – aduki, black, pinto, kidney, navy, great northern beans
      • 13 minutes – chickpeas
      • 20 minutes – dried yellow soybeans

Miscellaneous Methods

Canned beans tend to be less gas producing.  The canning process reduces FODMAPs.   Canned beans can have all sorts of chemicals on them that you don’t want, so be sure to rinse canned beans well.

Alpha-galactosidase is an enzyme that will help your body break down oligosaccharides.  “Bean-zyme” is a brand that is free of animal products.  The brand “Beano” may or may not be free of animal products.  The instructions on “Bean-zyme” bottles say to chew the tablets with the first bite of your meal. I’ve found their product to be far more effective when I hold the tablet under my tongue until it starts to dissolve.

Kombu is a seaweed you can buy in dried strips. Kombu has an enzyme in it that breaks down oligosaccharides.  The recommendation is to use a 3 inch strip when soaking or cooking legumes.  I haven’t found using kombu to be effective, but it may work for you.

Time.  If you have not eaten legumes regularly every day your digestive system will need time to adapt to it.  Start off with limiting yourself to 1/2 cup of cooked legumes per day.  Over 3-6 weeks the amount of gas you experience will begin to reduce.  Once you are experiencing less gas add 1 tablespoon per week to the amount of legumes you eat every day.  Increase more slowly or more quickly depending on the results you experience.

Cashew Curry Casserole

Most of my early cooking was done off of a hot plate in the years when I first left home and lived in places without kitchens. I never really learned many things that required an oven. This easy dish is one of the few casseroles I’ve made thanks to an old recipe at UrbanVegan.net

It is quick, healthy, tasty and fairly inexpensive. Very little clean up. I liked the Thai Curry Cashew sauce so much I’m going to use it on other things

6 Servings
Per serving: Calories 285, Protein 10.4g Sodium 482.2 mg

Ingredients

  • 1 head broccoli, chopped into 1 inch pieces, or one 1 lb bag of frozen broccoli
  • 1 15 oz can whole tomatoes
  • 1 16 oz can chick peas
  • 1 large onion, chopped
  • 1/2 cup plus 1 T cashew butter
  • 1/2 cup rice milk [soy milk would also work]
  • 1-2 tsp red curry paste
  • 2 T fresh basil, chopped very fine
  • 1/4 tsp salt

Optional Ingredients:

  • 8 oz. mushrooms, thinly sliced;
  • 1 red or yellow pepper,
  • thinly sliced;
  • 1 yellow squash, sliced

Directions:

  • Preheat oven to 400 degrees.
  • In a large bowl, whisk together the cashew butter, rice milk and basil.
  • Add the curry paste, 1/2 teaspoon at a time, until the sauce is as hot as you like.
  • Be sure to whisk well so no clumps remain.
  • Toss all the other ingredients in a large casserole.
  • Use a spatula to roughly break up the tomatoes, then pour on the cashew sauce.
  • Stir well until all ingredients are combined and well coated.
  • Cover with foil and bake for 40 minutes.
  • Remove foil and bake another 15-20 minutes, or until sauce has thickened.