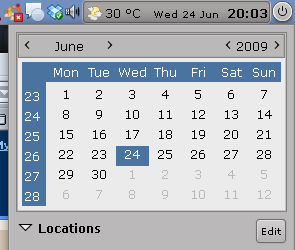
If you are an American Ubuntu user the GNOME Calendar Applet pictured above will default to Sunday being the first day of the week. There is no UI to change it. The reasoning from the people at GNOME is that starting the week with Sunday is a U.S. standard.
I’m an American and I’ve spent my whole life with calendars that start the week with Monday. I like to click on the calendar applet to see what day of the week a date I’m thinking about falls on. I find it annoying to bring the calendar applet up and see Sunday on the far left.
There are two ways this can be changed.
I found “Method #2” years ago, the information was not easy to find. The change is undone when Ubuntu updates for Daylight Savings Time. “Method #2” also stopped working for me when I upgraded to Ubuntu 10.10. I’m including it here for people for who “Method #1” does not work.
“Method #1” works with Ubuntu 10.10, is shorter and may not need to be done more than once ( I’ll find out with the next update for daylight savings time ). Basically, what you are doing is setting up Ubuntu to use British time standards instead of American time standards.
Method #1
- Bring up a terminal, enter the command sudo bash and enter your root password
- Change to your default setting directory with this command: cd /etc/default
- Open the file “locale” in a text editor
- Enter the following line: LC_TIME=”en_GB.UTF-8″
- Save the file and exit your editor
- Execute this command ( may not be necessary, but it can’t hurt ): locale-gen
- Restart Ubuntu
Method #2
Since Method #2 gets undone whenever Ubuntu updates for daylight savings time I decided to make myself a BASH script to make the change convenient. You can use it too.
If you feel nervous about using a script, you can just type the commands into a terminal yourself. I put step by step comments above each command.
To use the script below do the following:
- Copy and paste the code below into a text editor.
- Save the file as “makeMondayTheFirstDayOfTheWeek.sh”
- Change the permissions to make the script executable with this command:
chmod 777 makeMondayTheFirstDayOfTheWeek.sh
- Login as root, Ubuntu users can do this with this command:
sudo bash
- Run the script with the following command:
bash ./makeMondayTheFirstDayOfTheWeek.sh
- Press your Enter Key after typing the command
- Wait for the script to finish.
- Restart your computer
# Switch to your home directory
cd ~


# Remove old files and directories from the last time you had to do this
rm -rf ~/en_US_modified
rm -rf ~/locale
rm -rf /usr/lib/locale/en_US_.utf8_BACKUP


# Make a copy of your locale file, en_US in your home directory
cp /usr/share/i18n/locales/en_US en_US_modified

# Create a directory called "locale"
mkdir locale

# Search en_US_modified. Replace "first_weekday 1" with "first_weekday 2"
sed -i 's/first_weekday\t1/first_weekday\t2/g' en_US_modified

# Create a directory full of new locale settings inside of the "locale"
# directory you made in your home directory:
localedef -c -i en_US_modified -f UTF-8 locale/en_US.utf8

#Backup your current locale settings
cp -R /usr/lib/locale/en_US.utf8  /usr/lib/locale/en_US.utf8_BACKUP


# Copy the new en_US.utf8 directory your created in your home directory in the subdir "locales" to
rm -rf /usr/lib/locale/en_US.utf8
cp -R ~/locale/en_US.utf8 /usr/lib/locale

# Update the locales
locale-gen

# Restart the GNOME desktop
killall gnome-panel

#Restart your Ubuntu system for the change to take effect
echo Please Restart Ubuntu Linux To See The Change
HTH 🙂

